Spectra of Stars with a DSLR or small telescope
You and your students will be excited to view a real-time video of gas tube spectra in the classroom using our RSpec Explorer system (link).
But it’s even more exciting to capture the spectra of stars that are 25 light-years (or more) away! That’s more than 20 trillion kilometers!
You and your students can capture the spectra of bright stars using just a standard DSLR camera and tripod. Click the image below for video:
Note: Using a Star Analyser grating requires that you already be somewhat proficient at capturing images of stars. You’ll need to be able to locate specific stars in the sky. And you will need to be able to capture images of them that are properly exposed, well-focused, and not smeared from their movement through the sky. We’re happy to coach you on how to get started in astronomical imaging if you need to acquire these skills.
See additional examples of the exciting spectroscopy that your students can do with DSLRs and small telescopes on our showcase page: link.
How to get started
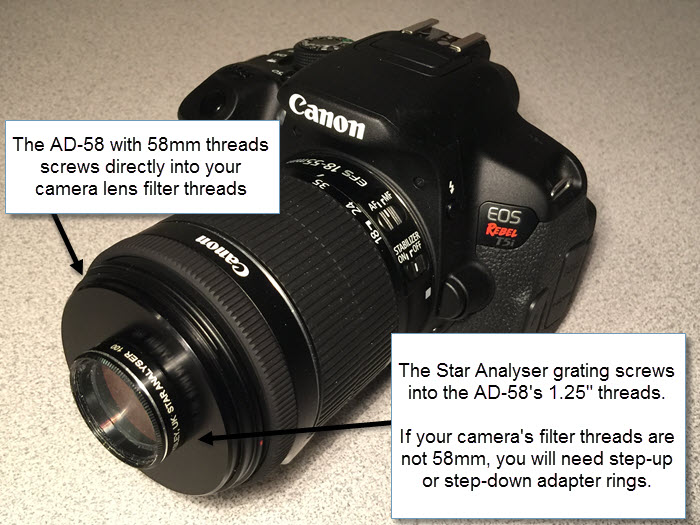
Use almost any DSLR with our Star Analyser ($195). The grating screws into a DSLR using our AD-58 thread adapter ($38):
Adapter Rings
Canon cameras have 58 mm lens cap threads. If the filter threads on your camera lens are not 58 mm, you’ll need a step-down or step-up ring.
If you order an adapter ring, “From”-end of the ring should have male threads that match your lens’ filter threads. This is generally referred to as the “first dimension.”
The “To”-end of the ring should be 58 mm female into which our AD-58 screws. And this, not surprisingly, is considered the “second dimension.”
Q. “How can I determine the diameter of my camera’s lens’ filter threads?”
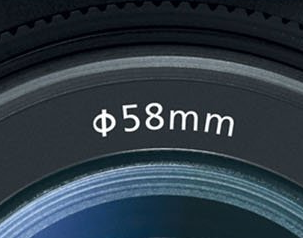
A. Some lens contain an imprint that shows their diameter. For example, the image below indicates 58 mm diameter lens threads:
Q. “How can I determine the diameter of my camera’s lens’ filter threads?”
A. Many lenses have an imprint that shows their diameter, as shown to the left.If your camera does not have a call-out like the one to the left, you will need to do some research on your specific lens. Often, vendors’ spec sheets will indicate the lens cap/filter thread size. If your camera’s filter threads are less than 58mm, you need a step-up ring: link. If your camera’s filter threads are more than 58mm, you need a step down ring: link. Also see their sets: link. Pay particular attention to their delivery times, which vary from size to size. Also (although a bit more expensive) see Adorama (link) and B&H (link). Contact us with questions (link) or visit your local camera shop and tell them you have a 58mm filter you want to mount on your camera lens.
Contact us with questions (link) or visit your local camera shop and tell them you have a 58mm filter you want to mount on your camera lens.
On bright stars like Vega, Sirus, or Deneb, you don’t need a motor-driven tracking mount. Just use your camera with a standard photographer’s tripod. You can use the “drift” method to capture an image like this one of Deneb:

When the stacked spectrum above is loaded into the RSpec software, you can clearly see the Hydrogen Balmer absorption lines:
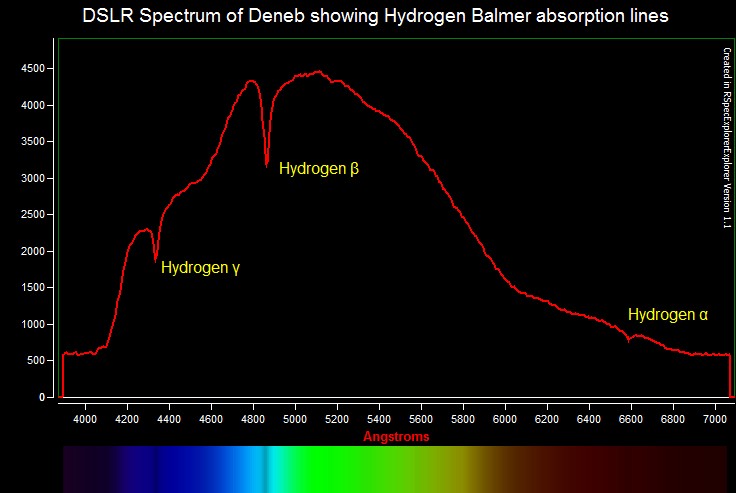
We recommend you start out with stars that have very strong Hydrogen Balmer absorption lines: type A stars like Vega or Deneb. The drift method is easy: you simply take a short time-exposure after orienting your DSLR so that the star moves across your camera sensor. Download our step-by-step “Getting Starting” pdf: link.
Your initial spectrum curves will likely be “fuzzier” than the one above. But they should definitely show absorption features. The above curve was created by combining multiple images using a process called “stacking.”
Do you have questions?
We specialize in getting newcomers up and running fast! Call or email us and we’ll help get you started. Use our contact form link. Or, call our support hotline: 206.453.4851.
Download our step-by-step guide to DSLR drift spectra

Our website editor strongly encouraged us to tone down our enthusiastic writing on this topic. But we refused! We admit it: we’re fanatical about spectroscopy. And we’re even more crazy about astronomical spectroscopy. We find it absolutely stunning that any of us can sit in their backyard with a few hundred dollars of off-the-shelf equipment and determine the composition of a star that is trillions of miles away!
Are you ready to have fun with DSLR spectroscopy? Order a Star Analyser grating and AD-58 adapter (Total cost: $233) from our store: link.
More Advanced DSLR Spectroscopy with inexpensive mechanical tracking
The drift time-exposure method only works on bright stars. To capture the spectra of dimmer stars, you need to add tracking so you can take longer time exposures. For about $400 you can add an inexpensive tracker to your tripod and DSLR. We recommend the iOptron SkyTracker: link.
Below is a 30-second exposure captured with a DSLR that was mounted on a mechanical tracker. This is the spectrum of a Wolf-Rayet star. These are older stars that have had their shells stripped away. The peaks below are the glowing Carbon soot in the core of the star. Wikipedia page WR stars: link).
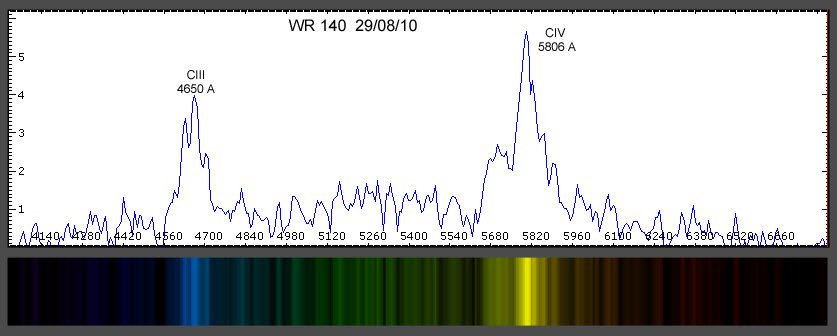
Wolf-Rayet star spectrum captured in six stacked, 30-second exposures with a Canon 350D DSLR
Ready to get started? Order a grating and adapter for only $233 today. With our same-day shipping, you’ll have them in 3 business days: link. Note: for DSLR use we recommend our Star Analyser 200 rather than 100. It gives better results. For most telescope usage, the SA-100 is preferred. Call us if you’d like to discuss your options.
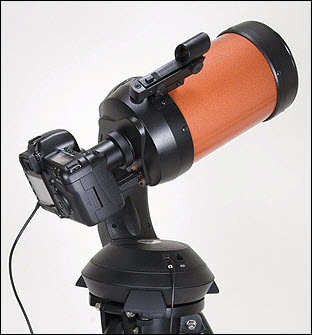
Already have a telescope? Mount your DSLR piggy-back!
If you have a tracking telescope, you can mount your DSLR piggy-back style, as shown below. Using your telescope’s drive makes it easier to aim and track.
Use your Telescope’s optics
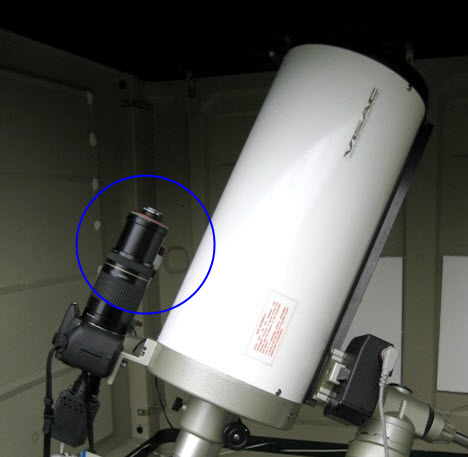
The configurations described above are called “objective grating” mounts since the Star Analyser grating is mounted on the front of the camera’s objective lens. This technique gives very good results. You can also use our Star Analyser grating on a 4″ to 14″ telescope with your DSLR, as shown below:
To use your DSLR at your telescope’s main focus as shown above, your camera needs a standard $11 T-Ring: link. Then, add our AD-T2 adapter ($38) as shown below. This allows you to insert a Star Analyser grating into the light path. The AD-T2 has 42mm threads to match your T-Ring:
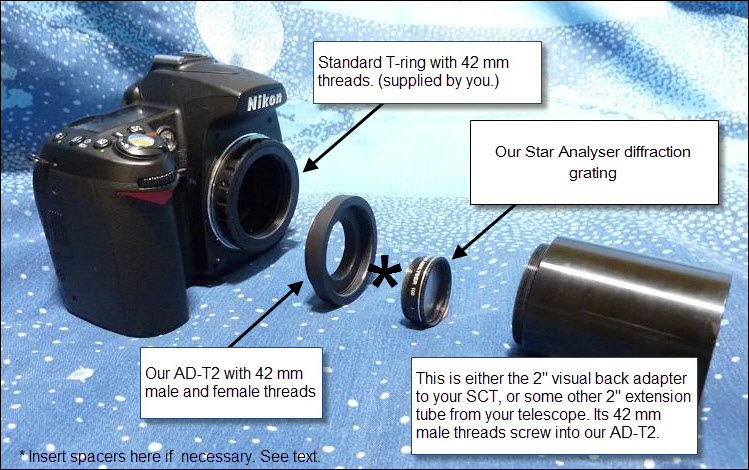
In all of the previously discussed AD-58 objective grating configurations, there are no spacing requirements: the grating just screws right into the AD-58 adapter on the front of the camera lens and you use the camera lens to zoom. However, when using an AD-T2, the distance to the camera sensor needs to be within a certain range. For more information: link. The total distance from the camera sensor to the grating when using our AD-T2 is about 70 mm. You can add spacers ($10 each) to increase this distance by 7 to 10 mm if necessary.
Spectroscopy using your astronomical CCD video or FITS camera
And finally, you can mount a Star Analyser on any astronomical camera, filter wheel, or nose piece. The Star Analyser has 1.25″ threads, so it screws in just like any other filter; no adapter is needed. As discussed above, you can add spacers to increase the distance from the grating to the camera sensor. Read more about this on our spacing page: link.
Want to blow your colleagues’ and students’ minds? Use your laptop to show a real-time video spectrum of Vega in your observatory or in your school’s parking lot! The ZWO camera (link or link) works right out of the box with our software for excellent results. Trust us – you and your colleagues will be ecstatic when seeing the excitement that a live spectrum generates!
Questions? Contact us for quick answers: link.
Study stellar temperature and structure
The Albireo double is a beautiful blue-gold showpiece that many of us are familiar with. The image below shows the spectra of each of its stars. You can easily see the energy on hotter Albireo B is concentrated in the blue end. And the energy of the amber star is towards the cooler red end of the spectrum. Notice the emission line (circled) at 6562? That’s from a glowing disk of gas around surrounding Albireo, which is a “Be” star.

Video Interview
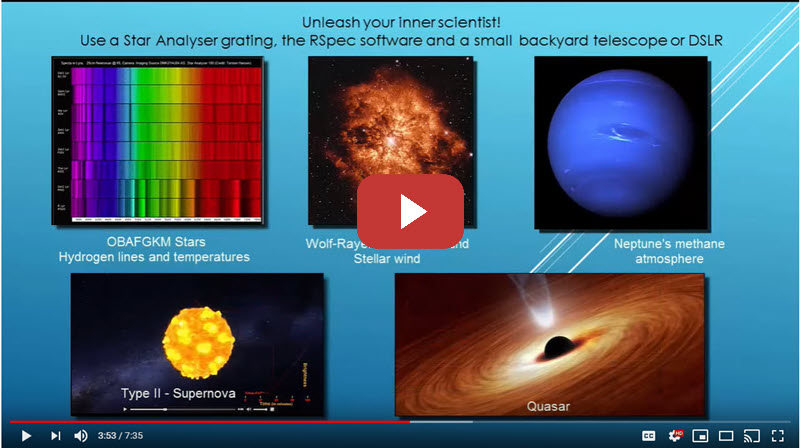
See Tom Field, the designer of the RSpec Explorer system, discuss how easy it is to capture stellar spectra. Tom discusses DSLR spectroscopy at about 2:20:
Additional Examples of Astronomical Spectra
Don’t miss seeing exciting examples of these star spectra: See our showcase page: link. The software that comes bundled with RSpec Explorer is the same software that was used for all of these images.